VMware released their latest version vSphere 6.7 on April 2018 and I have shared the details on one of my blog post. As we know there are multiple options like remote management console (KVM, ILO, iDRAC), CD Drive to install the ESXi to Physical Server. However, some cases due to a firmware issue, a limited number of ports on switch remote console license unavailability or CD ROM unavailability we will have challenges to install ESXi, in that case, bootable USB with ESXi installer will help to install the hypervisor.
In this post, I will explain how to create a bootable ESXi 6.7 Installer USB Drive using a free tool called Rufus. Following this method, you can create a bootable USB with vSphere 6.7 installer in less than two minutes.
Before starting the installation, you have to verify that all the prerequisites are met to install vSphere 6.7 , you can validate that requirement from the below checklist
vSphere 6.7 Installation Checklist
- Hardware Compatibility with vSphere 6.7 from VMware HCL website
- Virtualization Technology Intel VT or AMD-V available and enabled
- Hardware Firmware and Driver version from VMware and Vendor Website
- Vendor specified Custom ISO availability
Note:- You may create a Custom ISO by referring VMware Docs
Prerequisite
- vSphere 6.7 standard or Custom ISO image download from VMware or Vendor Website
For Free vSphere 6.7 License refer How to Obtain Free Version Of vSphere (ESXi) 6.7
- Free Software – A free software capable to make USB bootable, we are using Rufus free tool and you can download that from here
- USB Drive– A USB Drive with minimum capacity 4 GB or USB devices with 8 / 16 GB.
Create Bootable USB Installer
Navigate to the Rufus and vSphere 6.7 ISO Location and you can identify them as like below


Start Rufus Application
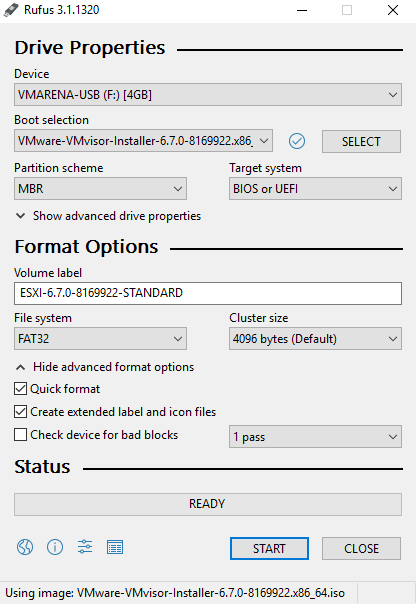
Verify the UDB Drive, here we are using ” VMARENA-USB “ with Capacity of 4 GB and Browse and map the downloaded ESXi ISO ” VMware-VMvisor-Installer-6.7.0-8169922.x86_64.iso ” and Click on Start
Note:- Leave the partition Scheme as default “MBR” or if it is shown as GPT please change to MBR and If required you may modify the Volume Label or leave it as default one
You will get a Popup message asking to replace menu.c32 , Select Yes to continue

A warning message will Popup All Data on the Device will be Destroyed, continue to Click OK
Note:-you can notice the device shows ready state ob this window

USB drive will be formatted and copying of installation files to USB device will start and it will take less than 2 Minute.

Once it is completed in application window you can see status hows READY and vSphere 6.7 UBN installer media is ready

Next Connect the USB drive to the server , power on and select the first boot device as USB and server will booted to Installation of vSphere 6.7
Note :- Boot order has to be configured in the server BIOS .
Refer vSphere 6.7 Installation and Setup Guide for more features like image builder
More vSphere 6.7 Posts
Feel free to share it on social media