In the previous article, we have discussed what is vCenter High Availability and deployment option in VMware vCenter 6.7 High Availability Configuration – PART 1. In this article, we are performing the vCenter HA configuration with Automatic mode with an embedded Platform Services Controller in vCenter Server 6.7. Before proceeding the configuration you have to validate the below-mentioned prerequisites.
Prerequisites
- vCenter Server Appliance which is Active node must have a static IP address and SHH is enabled
- Verify that your environment meets one of the following requirements.
- The vCenter Server Appliance that will become the Active node is managing its own ESXi host and its own virtual machine. This configuration is sometimes called a self-managed vCenter Server.
- The vCenter Server Appliance is managed by another vCenter Server. They both use an external Platform Services Controller, and both are running vSphere 6.5 or later.
- vCenter HA network should be available on all the three ESXi nodes where you are going deploy Active, Passive and Witness node
Configure the vCenter HA Network
As we mentioned above HA network is very important for vCenter HA configuration, this is mandatory for both types of deployment models. You must set up the HA network before starting the HA configuration. You can set up a port to an existing virtual switch or, for improved network isolation, you can create a new virtual switch and configure the HA network on that and note that It must be different from the management network. The vCenter HA network connects the Active, Passive, and Witness nodes and replicates the appliance stat and it monitors heartbeats also.
vCenter HA network IP addresses for the Active, Passive, and Witness nodes must be static one and the network must be on a different subnet than the management network. The three nodes can be on the same subnet or on different subnets. Additionally, make sure that Network latency between the Active, Passive, and Witness nodes must be less than 10 milliseconds and should not add a default gateway entry for the cluster network.
Log in to the vCenter Server and navigate virtual switches on the ESXi host where the Active node is running.

Select the Virtual Switch on the ESXI host and Add a port group from ADD NETWORKING option
Select Virtual Machine Port Group for a Standard Switch and Click Next

Verify that the virtual switch is correct you have selected or you have the option there to browse and select, Click Next

Provide a Network Label and add the VLAN ID and Click Next

Verify the details and Click Finish

- Follow the same procedure for other ESXi nodes where Passive and Witness node will be cloned.
- In addition to this make sure the management network also available on all the ESXi nodes.
Configure vCenter HA
Log in to the Active vCenter Node
Select the vCenter Server and navigate to Configure -> vCenter HA
Click on the Set Up vCenter HA to start the configuration wizard

Resource setting page will appear, where you can fill up the details of network, hosts, Storage, etc

In the Resource settings section, first, select the vCenter HA network for the active node from the drop-down menu
Select the checkbox for automatic configuration mode
Note:-If you do not select the checkbox, you must manually create clones for Passive and Witness nodes

From the Passive node, click Edit
Specify a unique name and target location, default the name will be “vCenter Name–Passive”, click Next

Select the destination to compute resource (ESXi Host) for the operation and Click Next

Select the datastore in which to store the configuration and disk files and Click next
Note:- vCenter HA Configuration support NFS, VSAN, and VMFS datastores

Select virtual machine Management (NIC 0) and vCenter HA (NIC 1) networks and Click Next

Review the settings and click Finish.

From Witness node, click Edit

Specify a unique name and target location, default the name will be “vCenter Name–Witness”, click Next

Select the destination to compute resource ( ESXi Host) for the operation and Click Next

Select the datastore in which to store the configuration and disk files and Click next

Select vCenter HA (NIC 1) network and Click Next

Review the settings and click finish

Now we have completed the Step 1 of the vCenter HA configuration Click on Next

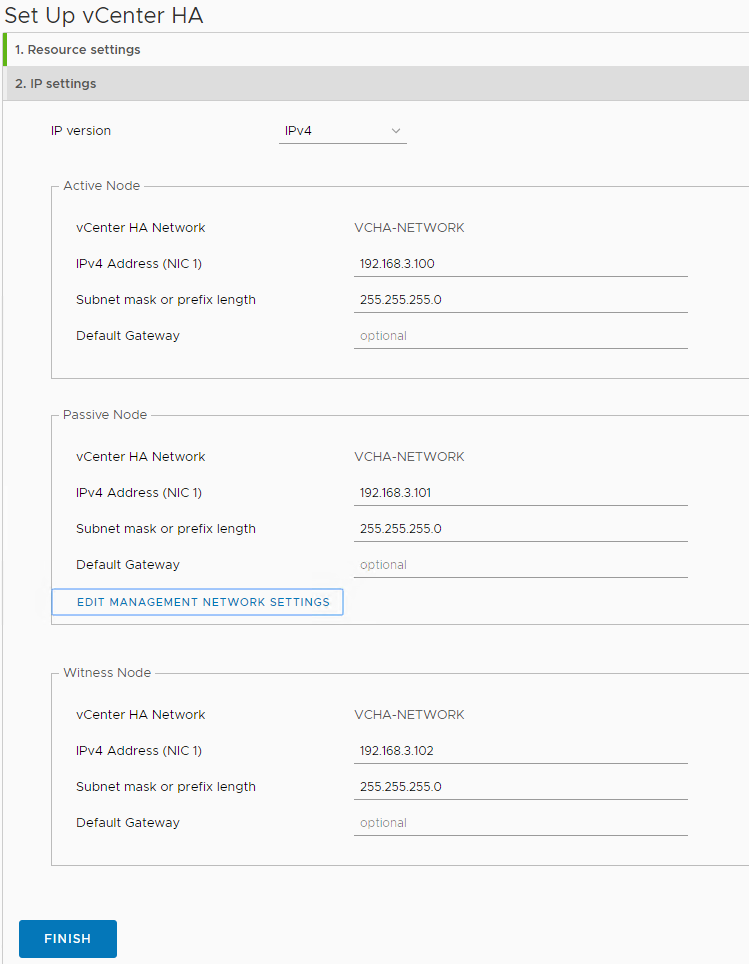
In step 2, we have to add the IP address for vCenter HA network
Enter the IPv4 address (NIC 1) and Subnet mask or prefix length information for the Active, Passive and Witness nodes and Click Finish
Note:- You have the option to Edit management network settings for the Passive Node. Customizing these settings are optional. By default, the management network settings of the Active node are applied.
You can monitor the status of the nodes from the vCenter HA configuration page – Cluster Nodes

As part of vCenter HA deployment, the first Passive node will be cloned from the active node and later witness node will be cloned from active one.

When Set Up vCenter HA is complete, the vCenter Server Appliance has high availability protection. After vCenter HA is enabled, you can click Edit to enter Maintenance Mode, Enable or Disable vCenter HA. There are separate buttons to remove vCenter HA or initiate vCenter HA failover.

Conclusion
vCenter High Availability (VCHA) is a great feature introduced in vSphere 6.5 and it had the ability to provide High Availability for your vCenter Server. Active-passive architecture vCenter High Availability (VCHA) safeguards your vCenter Server appliance from the host, hardware, or application failures. In this article, we have shared the procedure to configure the vCenter High Availability (VCHA) in vCenter Server 6.7 with an embedded platform controller.
The vCenter Server Appliance has provided vCenter High Availability (HA) with vSphere 6.5 onwards. In the fully-functioning HTML5 release of vCenter 6.7 Update 1 onwards the setup of vCenter HA was incredibly simplified.