In my previous post I have shared the Requirements For NSX Data Center For vSphere Deployment and here I will cover the cluster preparation , Controller deployment steps .
Controller Deployment
I have already shared the details about Controller in NSX Data Center for vSphere Overview post , so not going to explain here again and we will go for deployment steps.
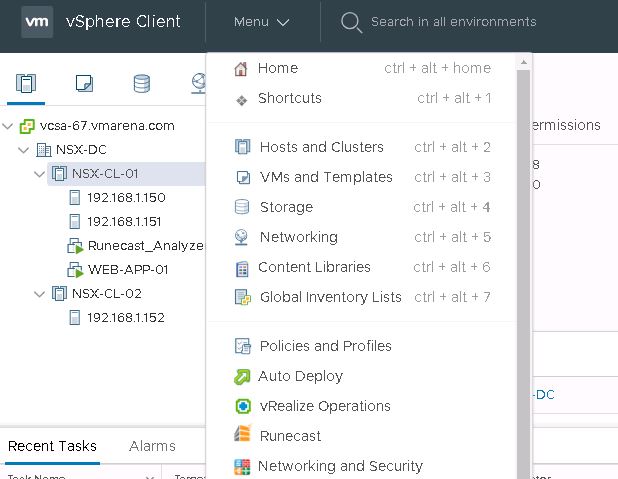
Login to vCenter web client and Navigate to Network and security.
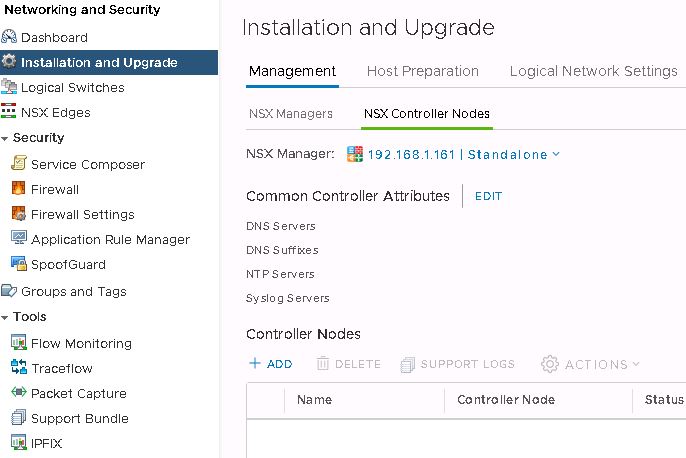
Select Installation and Upgrade -> Management – > Select NSX Controller Nodes and Click on ADD to deploy Controller nodes
Provide strong password and click Next

Note :- Password must not contain the username as a substring. Any character must not consecutively repeat three or more times.
The password must be at least 12 characters and must follow three of the following four rules:
- At least one uppercase letter
- At least one lowercase letter
- At least one number
- At least one special character
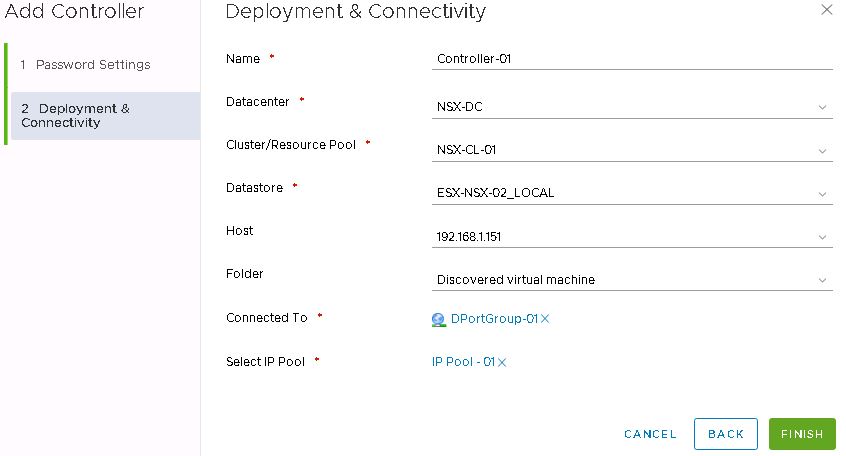
You have to provide the NSX Controller settings appropriate for your environment.
Name for Controller , Select the Data Center , Cluster . Resource Pool , Available data store and Host , folder where you want to place the controller and click OK
network and ip pool you can follow next steps
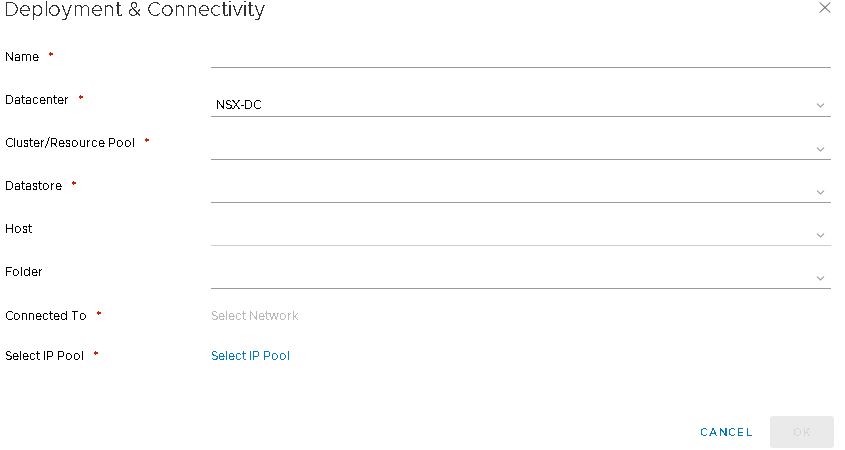
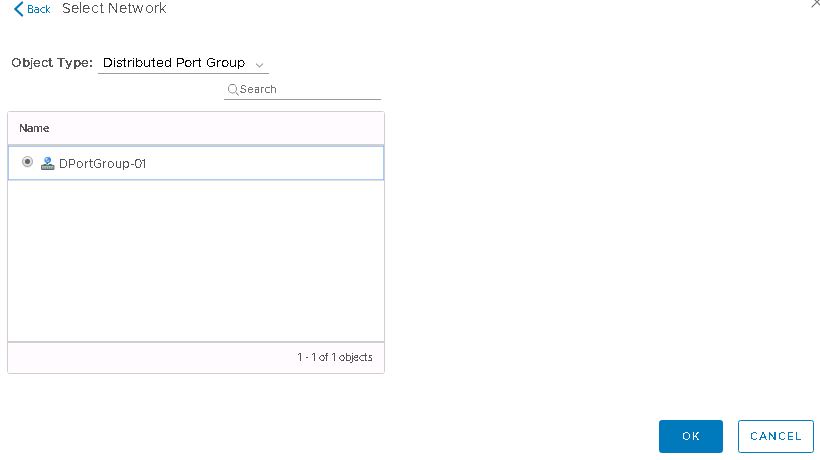
Use Select Network option to choose the Network port group to which Controllers will be connected to
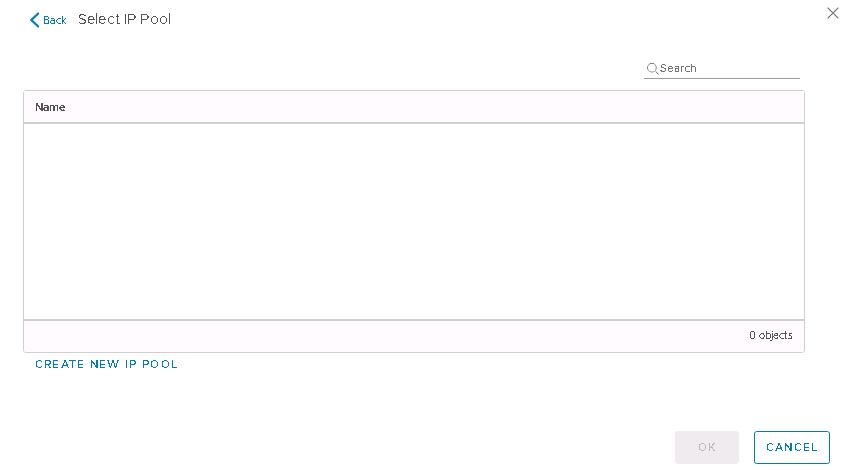
Use Select IP Pool option for providing pool , if there is no IP Pools , you can create from there using Create New IP Pool Option

Create a New IP Pool
Select Create New IP Pool
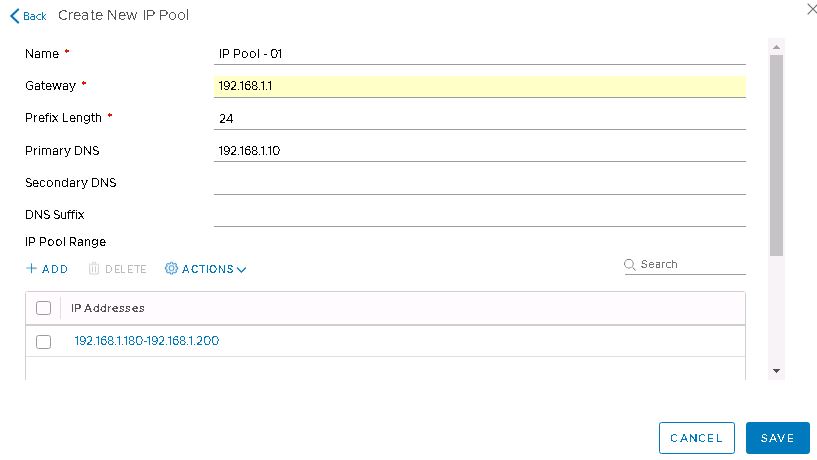
Provide Pool Name , Gateway , Prefix for Subnet , DNS and Click On ADD and provide IP range and save and this pool will available to use while deploying controller
We have provided all the required details now click on finish to start the deployment of controller
Note :- For production environments recommended to deploy 3 controllers and Configure a DRS anti-affinity rule to prevent the controllers
from residing on the same host , and for lab purpose one controller is sufficient.
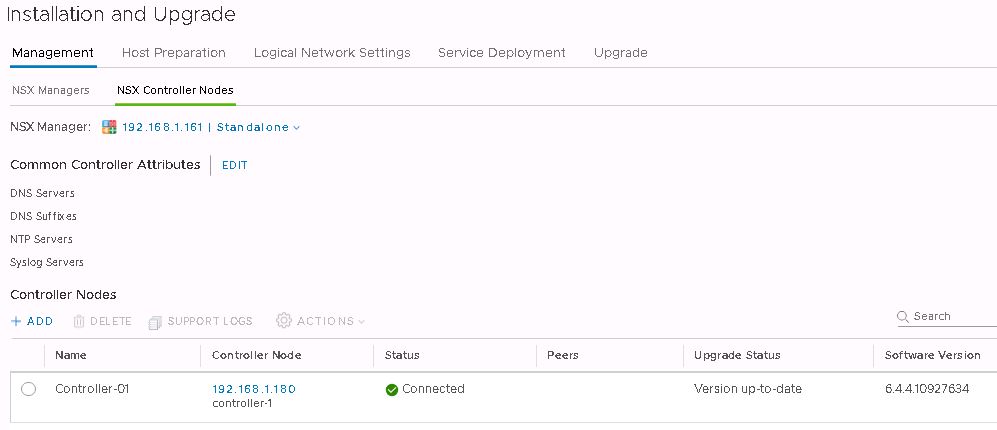
You can Monitor the deployment status on the same tab and task running on vCenter

Controller is deployed as a OVF method and its required min 30 GB free space and 8 GB RAM and 2 CPU resource available.

Once Controller is deployed you can see it shows connected .
Note:- If the column says Not Ready, click Actions > Resolve. Clicking Resolve might result in a reboot of the host. If the installation is still not successful, click Not Ready. All errors are displayed. Take the required action and click Resolve again
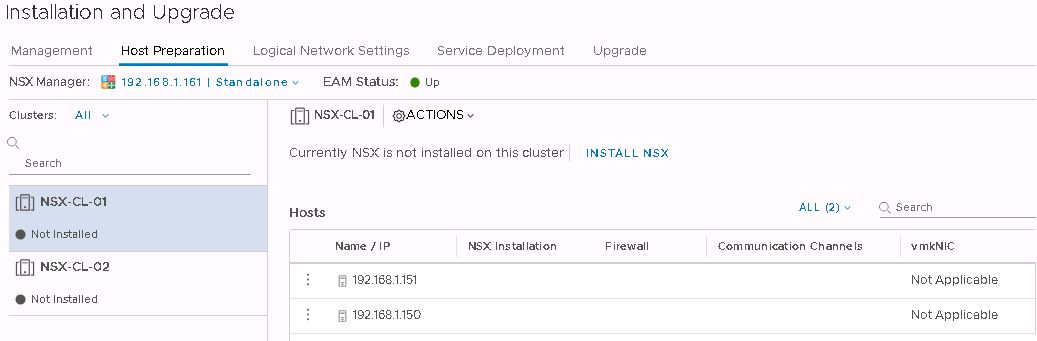
Preparing the Clusters for NSX Datacenter for vSphere
This process actually preparing the hosts in the cluster from Host prepartion Tab next to NSX controller deployment Tab
Navigate to Network and security –> Installation and upgrade –> Host preparation -> select the cluster and click Install .
You will get a popup message to confirm the installation click on Yes to start the host preparation

This operation will install the NSX VIB’s on the ESXi Hosts on the cluster and you can monitor on the same window
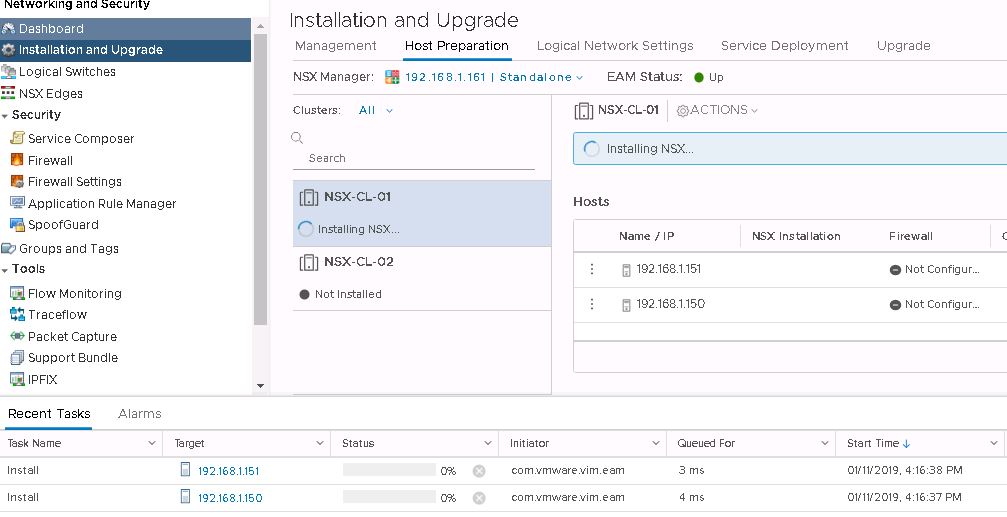
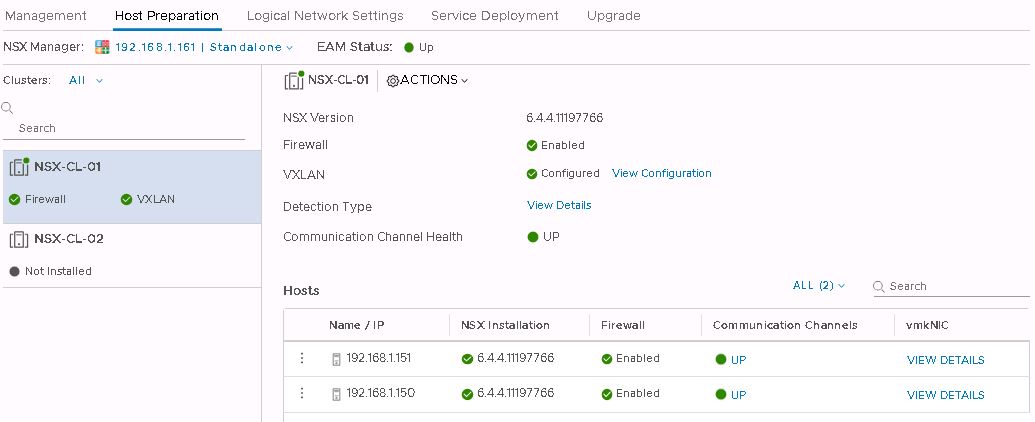
Once hosts preparation is completed you can see the version on NSX and firewall is enabled and Communication channel status shows up.

VIBs are installed and registered with all hosts within the prepared cluster and you can verify relevant VIBs installed by running below command on ESXi host .
esxcli software vib list | grep nsx
![]()
Note :- If you add a new host to a prepared cluster, the NSX Data Center for vSphere VIBs will automatically get installed on the host and if you move a host to an unprepared cluster, the NSX Data Center for vSphere VIBs are automatically uninstalled from the host.
Configuring VXLAN
To configure VTEP for VXLAN encapsulation hosts should be part of distributed switch which is prerequisite , if hosts are not part of VDS you can refer my post
Create Distributed Switch VDS For NSX Data Center For VSphere
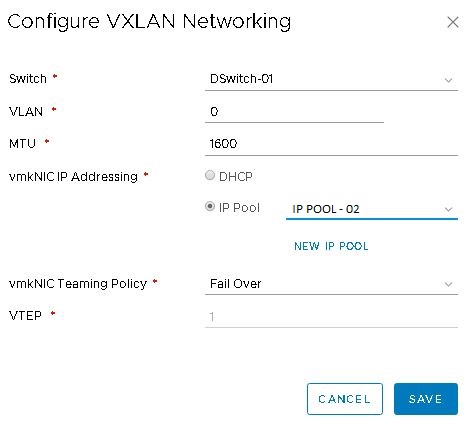
After the host preparation you can see VXLAN option is not configured , you can click on the Configure option and add the details , VDS , MTU ,IP Pool or DHCP is it is available and Teaming policy as per your requirement and click save
Note:- MTU as minimum 1600 or more based on your network switches configuration.
In a while you can VXALN is configured and you can check the ip form vmknic -> view details option
Verify VXLAN port group
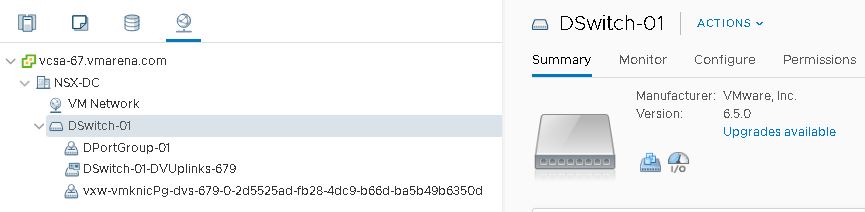
Configuring VXLAN results in the creation of a new distributed port group in the specified vSphere Distributed Switch, you can check from Network Options .
Create Segment ID
VXLAN segments are built between VXLAN tunnel end points (VTEPs). Each VXLAN tunnel has a segment ID. You must specify a segment ID pool for each NSX Manager to isolate your network traffic.
To configure the segment ID’s Navigate to Networking & Security > Installation and Upgrade >Logical Network Settings and In segment ID pool settings select edit and provide a range for segment IDs, such as 5050-6000 and Click Save .
When you configure logical switches, each logical switch receives a segment ID from the pool.
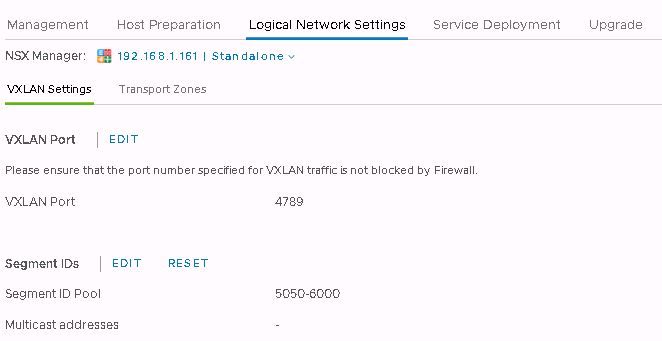

Note:- If any of your transport zones use multicast or hybrid replication mode, you must add a multicast address or a range of multicast addresses and this is optional.
Select or turn on the Enable Multicast addressing feature.
Enter a multicast address or multicast address range, such as 239.0.0.0-239.255.255.255.
Create Transport Zones
A transport zone controls to which hosts a logical switch can reach. It can span one or more vSphere clusters. Transport zones dictate which clusters and, therefore, which VMs can participate in the use of a particular network. An NSX Data Center for vSphere environment can contain one or more transport zones based on your
requirements. A host cluster can belong to multiple transport zones. A logical switch can belong to only one transport zone.
NSX Data Center for vSphere does not allow connection of VMs that are in different transport zones. The span of a logical switch is limited to a transport zone, so virtual machines in different transport zones cannot be on the same Layer 2 network. A distributed logical router cannot connect to logical switches that are in different transport zones. After you connect the first logical switch, the selection of further logical switches is limited to those that are in the same transport zone. Similarly, an edge services gateway (ESG) has access to logical switches from only one transport zone .
To create a Transport Zone navigate to Networking & Security > Installation and Upgrade > Logical Network Settings
Click Transport Zones and then click Add.
![]()
Enter the New Transport Zone a name and an optional description and depending on the requirement select the replication mode , in our case we use Unicast .
Note:- Unicast not required any modification on the physical switch
Select the clusters to be added to the transport zone
![]()
- Multicast: Multicast IP addresses in the physical network are used for the control plane.This mode is recommended only when you are upgrading from older VXLAN deployments. Requires PIM/IGMP in the physical network.
- Unicast: The control plane is handled by an NSX Controller. All unicast traffic leverages optimized head-end replication. No multicast IP addresses or special network configuration is required.
- Hybrid: Offloads local traffic replication to the physical network (L2 multicast). This requires IGMP snooping on the first-hop switch and access to an IGMP querier in each VTEP subnet, but does not require PIM. The first-hop switch handles traffic replication for the subnet.
How To Test VXLAN
You can follow the the below command mentioned on VMware KB
vmkping ++netstack=vxlan <vmknic IP> -d -s <packet size>

esxcli network diag ping --netstack=vxlan --host <vmknic IP> --df --size=<packet size>
Note:- You can check the vmk ips using below command
#esxcfg-vmknic -l
Reference – NSX Installation Guide