An overview of the Architecture
A vCenter High Availability cluster consists of three vCSA 6.5 appliances deployed in an Active, Passive and Witness configuration.
- The Active node is a standard vCenter instance, the state of which is regularly replicated to the Passive node.
- The Passive node takes over when the entire Active node or critical components fail.
- The Witness node is a lighter version of the appliance acting as a quorum. This a clustering technique that mitigates against split-brain or network partitioning events. This is when the Active and Passive nodes are both running but unable to talk to each other. One possible outcome is that you end up having two Active nodes which is bad to say the least.
To set up a vCenter HA cluster, we being by installing vCSA as we’d normally do. One of the requirements is to have a second network card connected to the HA or cluster private network. The inclusion of a second nic is taken care of automatically when selecting the Basic deployment option; see further down. The HA network is simply a portgroup created on ESXi.
VMware recommends placing each HA node on its own ESXi host. The hosts in turn, should be in a DRS cluster though the requirement is optional. In practice, this means you would need 3 ESXi hosts at a minimum. Also note that the HA portgroup must be created on every ESXi hosting an HA node.
After the Active node is configured, the Passive and the Witness nodes are cloned off of it. The cloning process can be either automated or done manually, depending on the deployment mode selected; Basic or Advanced.
In today’s post, I’ll be writing about the Basic option which does most of the donkey work for you.
Figure 1 illustrates a typical vCenter HA cluster architecture. The Active node has two allocated IP addresses, 192.168.16.50 which is the management address and 172.168.0.1 , the HA network address. Note that while the HA network can be routable, you should not add a gateway address when configuring the second network card on the vCSA.
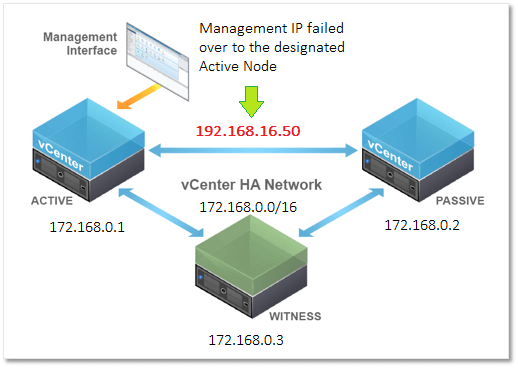
In the event of an Active node failure, the Passive node takes over and becomes the Active node. The management IP address is carried over to the newly designated Active node.
Requirements
There are a number of software and hardware requirements you must take core of, these being:
- vCSA 6.5. HA is only supported on this release.
- HA cluster nodes are only supported on ESXi 5.5 and/or vCenter Server 5.5 or later.
- Ideally, every HA node should reside on a different host and datastore. Optionally, the hosts should be in a DRS cluster. A minimum of 3 hosts is then required.
- The vCSA deployment size should be set to Small (4 vCPUs / 16GB RAM) or better.
- Create a port group on ESXi for the private HA network. Optionally, you can have a dedicated vSwitch if network isolation is a requirement.
- The HA private network must reside on a different subnet other than that used for management.
- You cannot mix IP4 and IP6 addressing when configuring networking on the nodes.
- Network latency on the HA network must be less than 10ms.
- No gateway for the HA network must be specified when configuring the nodes.
- You will need one IP address for management and three private IP addresses, one for each HA node.
- DNS A and PTR records for the Active node’s management network (i.e. FDQN for the vCSA).
Start Configuring
The great thing about vCSA HA, as with many other features, is the ease with which it can be set up in a test lab. In fact, a single ESXi host will suffice but as always make sure to follow the product literature to the letter when deploying to a production environment.
At the moment I do not have a dedicated physical ESXi host for testing so, instead, I deployed a beefed up nested ESXi 6.5 host sporting 4 vCPUs, 32 GB of RAM and 500 GB of storage space. Anyway, after installing and configuring the nested ESXi host, the first thing I did was to create the HA portgroup.
Creating the HA Network on ESXi
This is easily accomplished using the ESXi host management UI (https://<ESXi FQDN or IP Address>/ui). Log in as root and select Networking from Navigator as in Figure 2.
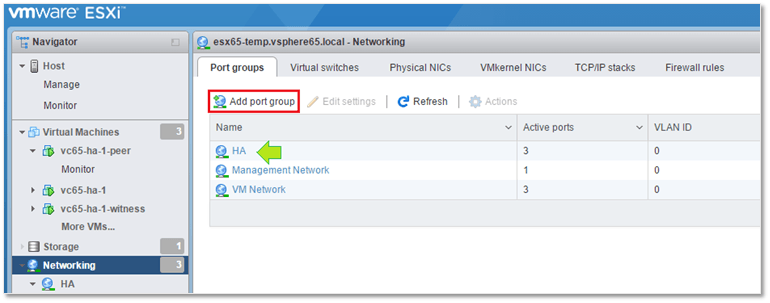
Click on Add port group and type in the port group name (HA in this case). Next, select the vSwitch where you want the port group created or just create a new one. Since we will be hosting the vCenter HA nodes on nested ESXi, we must enable Promiscuous mode on the vSwitch to allow inbound and outbound traffic to the rest of the world.
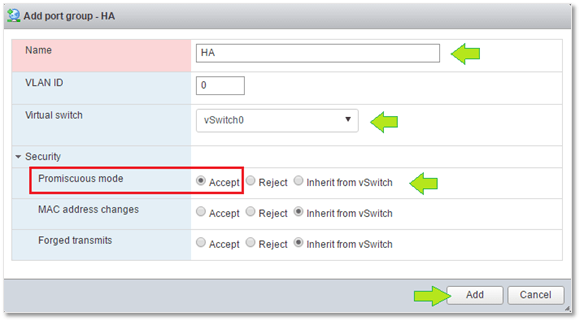
Note: Promiscuous mode must only be enabled on nested environments such as the one I’m using. It is not an vCSA HA requirement.
Installing the Active Node
To install the first node, follow the procedure share don the post Install vCenter Server Appliance 6.5 With External PSC
There’s one important step to carry out before moving on. I need to have the vCSA just installed manage the ESXi host where it resides. This setup is called a self-managed vCenter Server and is a requirement for configuring vCenter HA with the Basic option. Alternatively, the vCSA can be managed by vCenter Server as long as both share the same single sign-on domain.
If you omit this requirement, you won’t be able to set up HA using the Basic option. As I learned first hand, the installer simply throws an error at you telling you that it was unable to locate the vCSA in the inventory.
Creating the HA Cluster
The procedure to setup vCenter High Availability is dead simple.
First, point your browser to https://<vcenter FQDN or IP address>/vsphere-client and log in as administrator@vsphere.local.
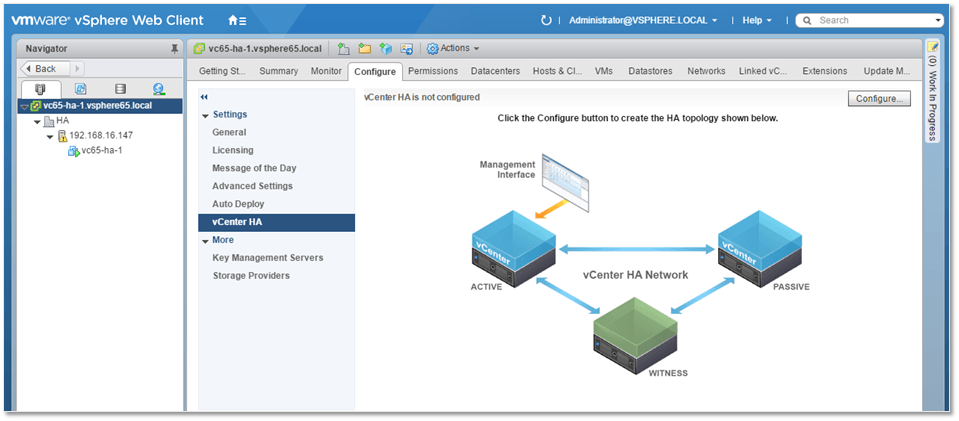
In my test setup, I created a DC called HA and placed the nested ESXi host under it. The vCSA can be seen listed in Figure 4 as vc65-ha-1.
Next are the actual steps that will create the HA cluster for us.
1 – Using the vSphere Web Client, highlight the vCenter Server name in Navigator and select the Configure tab. Under Settings, select vCenter HAand click on the Configure button.
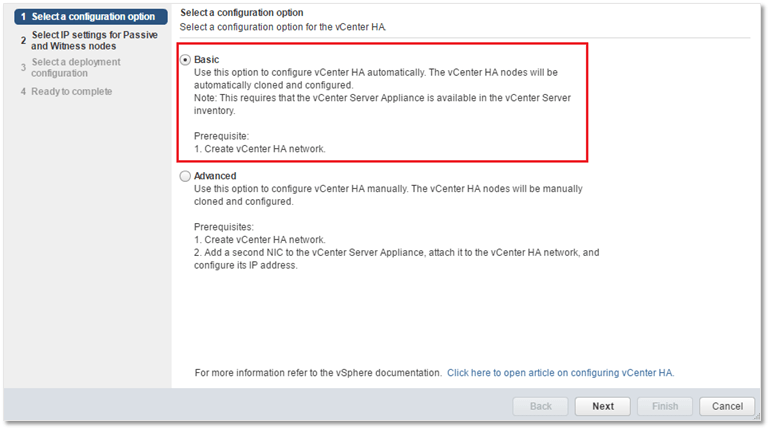
2 – Select the Basic option and press Next.
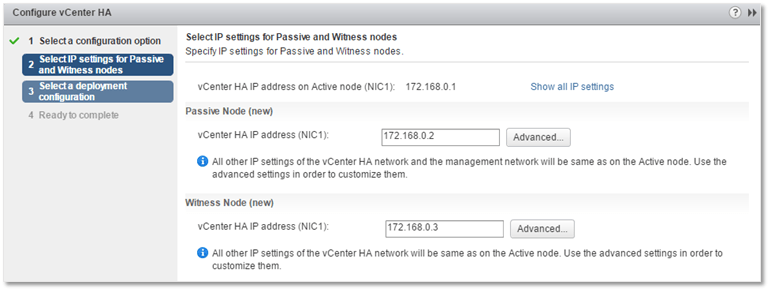
3 – Type in the private HA IP addresses for both the Passive and Witness node. Optionally, you can customize IP addressing for all nodes using the Advanced button. Press Next.
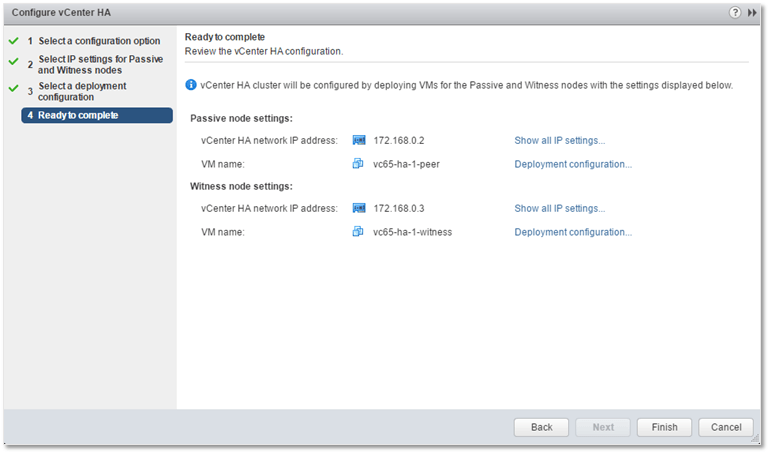
4 – Here you can review the nodes configuration and affect any changes if needed. Press Next.
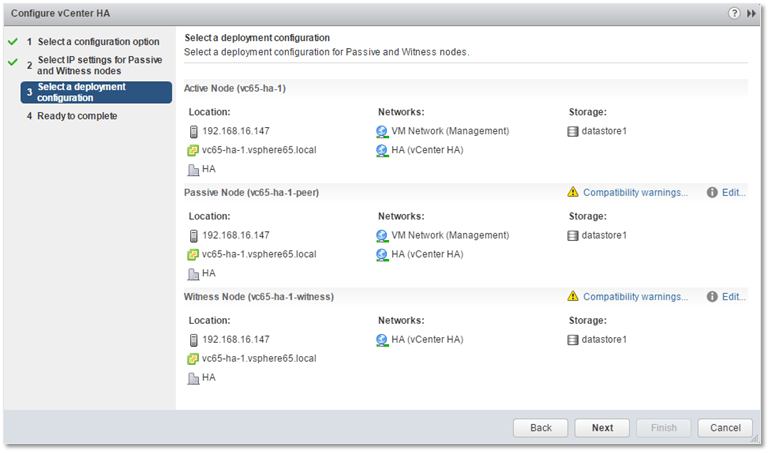
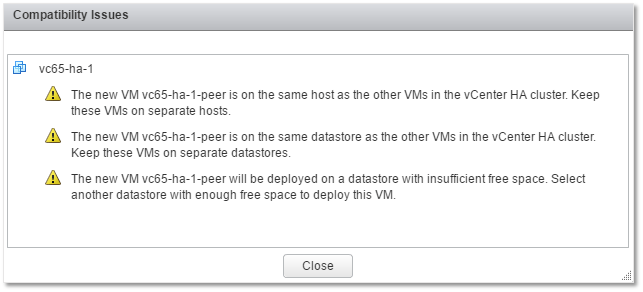
As you can see, I’m getting a load of warnings on account of deploying to a single host and datastore.
5 – Press Finish to kick off the HA cluster creation process.

As already mentioned, the Basic option automates the cloning process for you. The first vCSA clone created is the Passive node immediately followed by the Witness node. As per Fig. 11a, the -peer and -witness suffixes are appended to the Passive and Witness node VM names respectively. If the cluster creation process completes successfully, you should hopefully get an Up status for all three nodes.
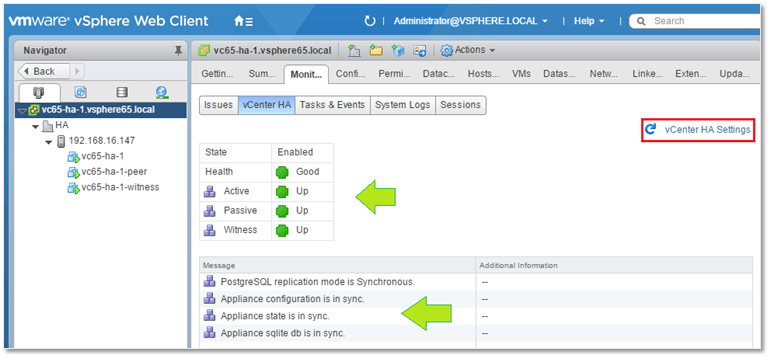
Clicking on the vCenter HA Monitoring link will give you further details about the health of the HA cluster (Fig. 11b).
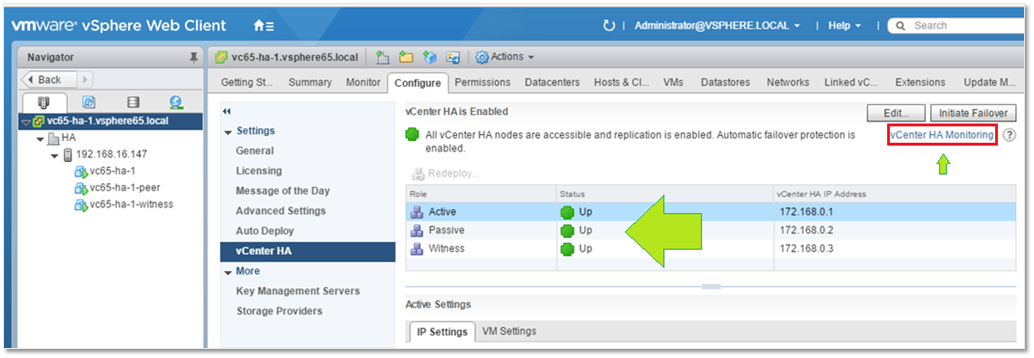
Of course, the whole point of having an HA cluster is to have the Active node failover automatically when trouble ensues. In fact this is the default behavior however you still have some level of control over the failover process. Clicking on the Edit button (Fig. 11a) allows you to do several things. Enable vCenter HA is the default setting as mentioned. Maintenance mode disables automatic failover however replication keeps on working. If you want to disable both failover and replication but keep the HA configuration intact, select the Disable vCenter HA option. And finally, if you’re having a bad day, go ahead and destroy the cluster altogether by selecting Remove vCenter HA.

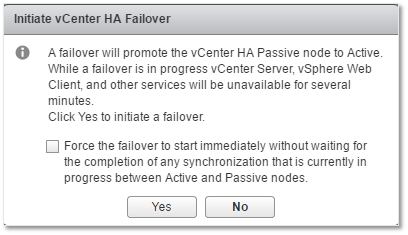
When automatic failover is disabled, a manual failover may be carried out via the Initiate Failover button (Fig. 11a). I tested this out in my lab and it took vCenter approximately 2-3 minutes to come back online, which I think is a tad bit slow. All things considered, I’m running everything on nested ESXi, not the ideal of scenarios but I’m still curious as to what the response times would be when using proper hardware. The documentation doesn’t really give hints as to what this should be.
Edit: The RTO is of 5 minutes as confirmed by VMware but will be improved on in the future.
In truth, the warning from Fig. 13 does say several minutes but I still think that service resumption time should be measured in seconds not minutes.
It did take a while before the passive node took over. The failover progress can be viewed in a browser if you try to access the vCSA using the web client.
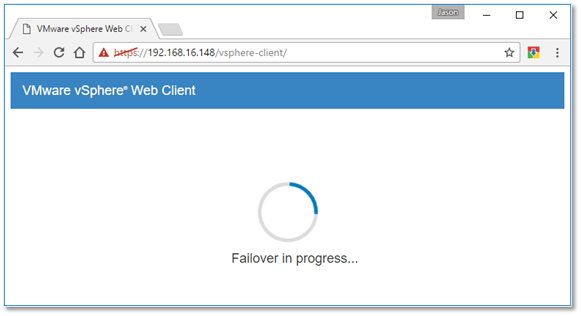
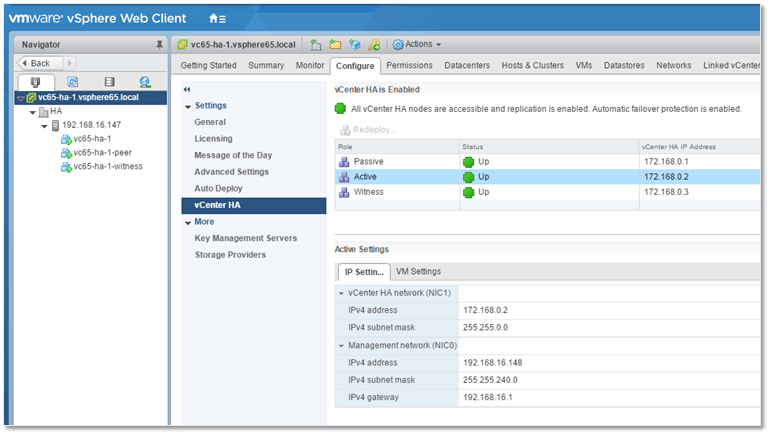
Looking at Figure 15, you’ll probably notice that what was previously the Passive node has now changed over to being the Active node. Notice also that the management IP – 192.168.16.148 – failed over as well but the HA address – 172.168.0.2 – remained the same which is how things are supposed to work.
Some Additional Information
DRS
If you’re deploying the HA cluster to a DRS enabled vSphere cluster with less than 3 hosts, you will run into issues with the cloning process. The obvious solution is to use a minimum of three ESXi hosts and/or avoid deploying the HA cluster to a DRS cluster. Another option is described in this article which works around the issue by changing the config.vpxd.vcha.drsAntiAffinity vCenter advanced setting to false. Again, this is only applicable to testing scenarios. You can also go in and disable the affinity rule the installer creates after it fails the first time round.
Snapshots and DVD mounted ISOs
If you get the following error “The operation is not allowed in the current state. vCenter HA does not support an Active node having disks on more than one datastore“, make sure that the vCSA being cloned does not have any snapshots and that the VM’s DVD setting is set to Client Device.
Restored vCSA
Cloning a vCSA which has been restored from backup, may result in the error shown below. This is precisely what I ended up with when I cloned an existing vCSA which I had restored at some point or another . I haven’t found any workaround for this, so my advice would be to always start with a freshly installed vCSA when setting up an HA cluster.

More troubleshooting tips can be found on the vSphere 6.5 documentation site.
Backup and Restore operations
When taking backups, avoid backing up the Passive and Witness nodes. Just take a backup of the Active node. When restoring an Active node, you must remove all the cluster configuration, restore and re-create the HA cluster.
