AWS Storage Gateway connects an on-premises software appliance with cloud-based storage to provide seamless integration with data security features between your on-premises IT environment and the AWS storage infrastructure. You can use the service to store data in the AWS Cloud for scalable and cost-effective storage that helps maintain data security. AWS Storage Gateway offers file-based, volume-based, and tape-based storage solutions , In this post we will share you procedure to create File gateway which is required for uploading your data to Amazon S3 .
We have used this feature for one of the NKIVO Backup & Replication ofsite backu pconfigureation and it is very useful . An AWS Gateway is basically an appliance available in different platforms (VMware, Hyper-V, Amazon EC2) that connects an on-premises software appliance with cloud-based storage.In our case we are going to deploy the gateway appliance to our VMware infrastructure and connect to Gateway .
About File Gateway
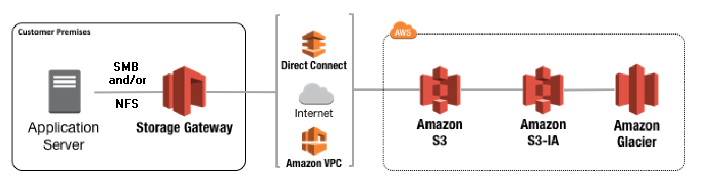
A file gateway supports a file interface into Amazon Simple Storage Service (Amazon S3) and combines a service and a virtual software appliance. By using this combination, you can store and retrieve objects in Amazon S3 using industry-standard file protocols such as Network File System (NFS) and Server Message Block (SMB). The software appliance, or gateway, is deployed into your on-premises environment as a virtual machine (VM) running on VMware ESXi or Microsoft Hyper-V hypervisor. The gateway provides access to objects in S3 as files or file share mount points. With a file gateway, you can do the following:
- You can store and retrieve files directly using the NFS version 3 or 4.1 protocol.
- You can store and retrieve files directly using the SMB file system version, 2 and 3 protocol.
- You can access your data directly in Amazon S3 from any AWS Cloud application or service.
- You can manage your Amazon S3 data using lifecycle policies, cross-region replication, and versioning. You can think of a file gateway as a file system mount on S3.
A file gateway simplifies file storage in Amazon S3, integrates to existing applications through industry-standard file system protocols, and provides a cost-effective alternative to on-premises storage. It also provides low-latency access to data through transparent local caching. A file gateway manages data transfer to and from AWS, buffers applications from network congestion, optimizes and streams data in parallel, and manages bandwidth consumption.
To use a file gateway, you start by downloading a VM image for the file gateway. You then activate the file gateway from the AWS Management Console or through the Storage Gateway API. You can also create a file gateway using an Amazon EC2 image.After the file gateway is activated, you create and configure your file share and associate that share with your Amazon S3 bucket. Doing this makes the share accessible by clients using either the NFS or SMB protocol. Files written to a file share become objects in Amazon S3, with the path as the key. There is a one-to-one mapping between files and objects, and the gateway asynchronously updates the objects in Amazon S3 as you change the files. Existing objects in the bucket appear as files in the file system, and the key becomes the path. Objects are encrypted with Amazon S3–server-side encryption keys (SSE-S3) and all data transfer is done through HTTPS.
AWS Storage Gateway Configuration
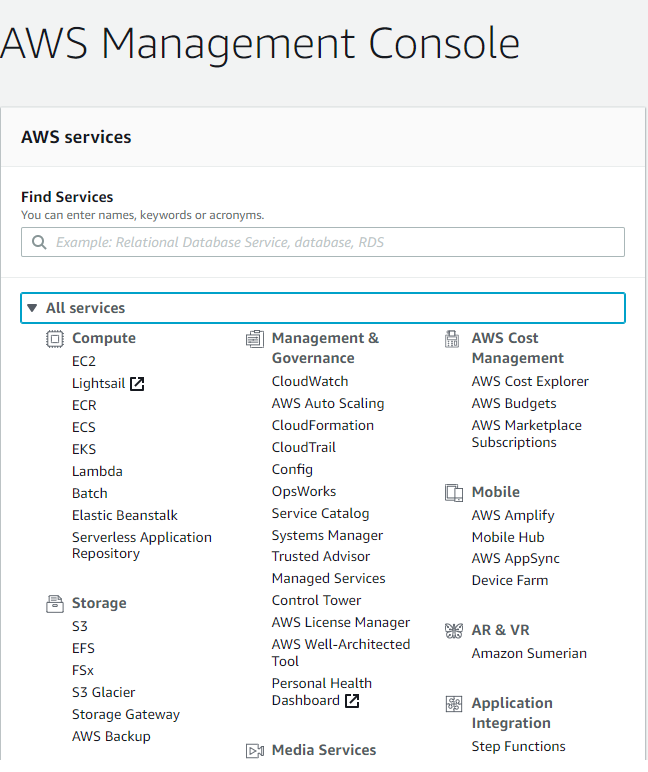
Login to AWS Management Console using your account credentials
From AWS services section select Storage Gateway option under Storage area
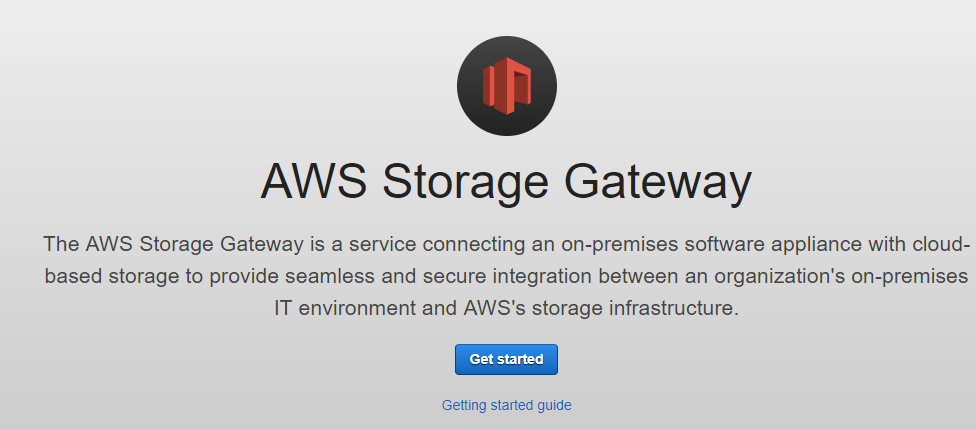
Click Get started
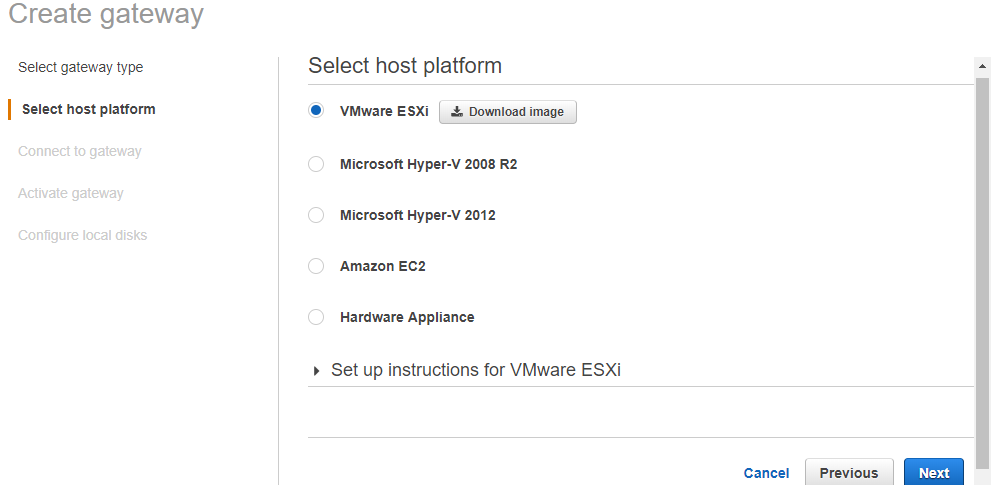
Select File gateway from available gateway types and click Next.
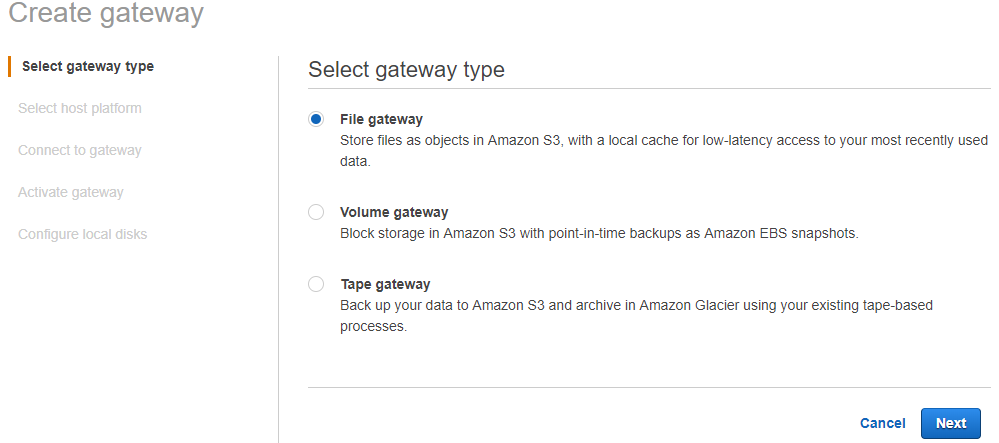
Select VMware ESXi click next to configure the appliance , since we won’t have appliance in our environment we will download the image and Deploy in your virtual environment .
Lets stop here and deploy the Appliance then we will continue
Deploy the AWS Storage Gateway
Open the vSphere Web Client, right click the cluster / host and select Deploy OVF Template option

Browse and select the .OVA file and click Next.

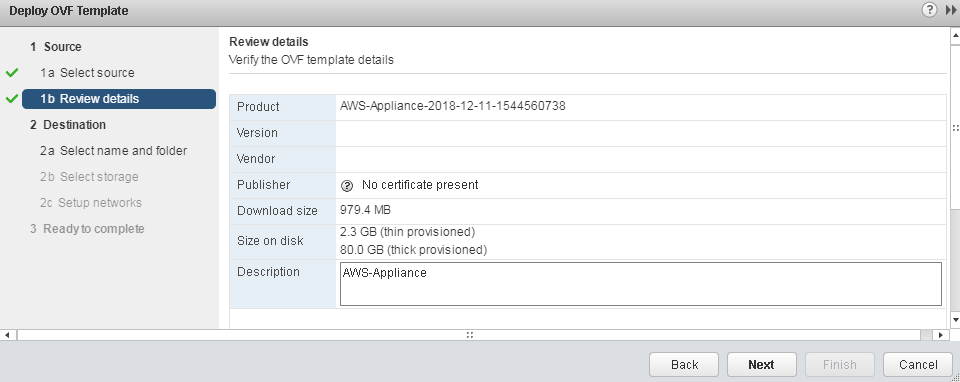
Review the OVA details and click next
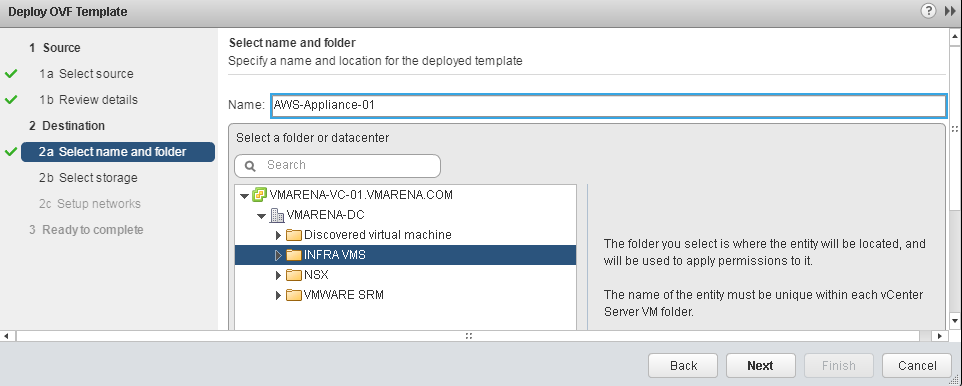
Enter a Name for the Appliance , Select the folder where to be placed the VM and Click Next
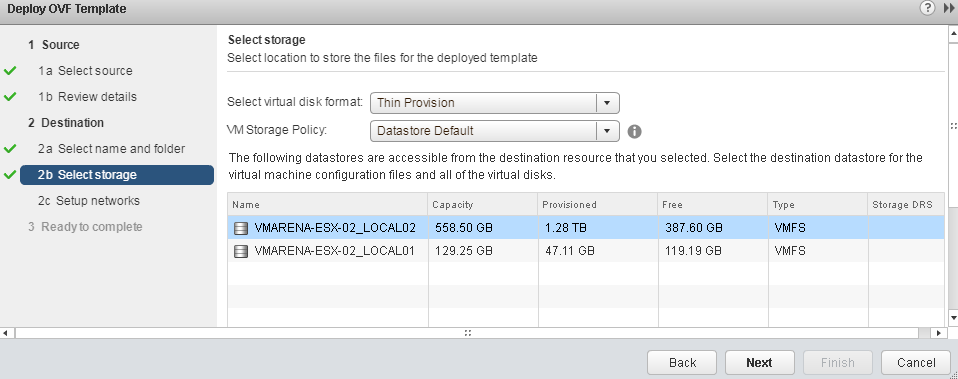
Select the Storage where to store the VM , disk format and click Next
Select the Network and Click Next

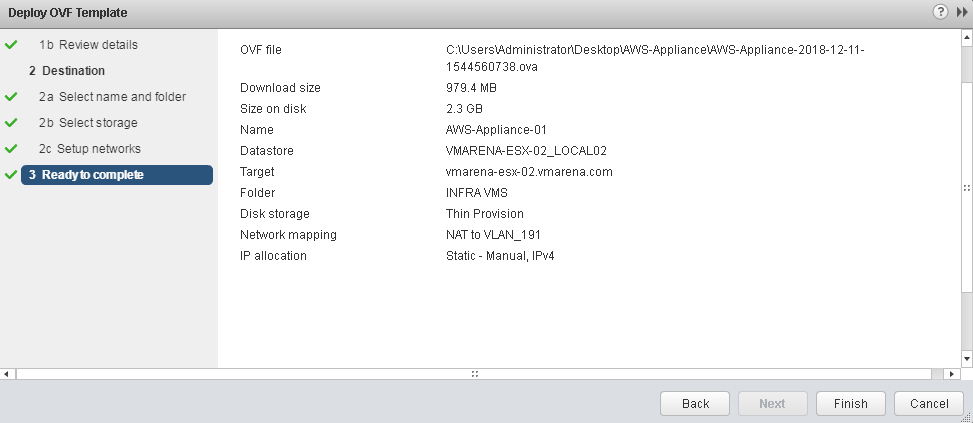
Review the details and Click on Finish
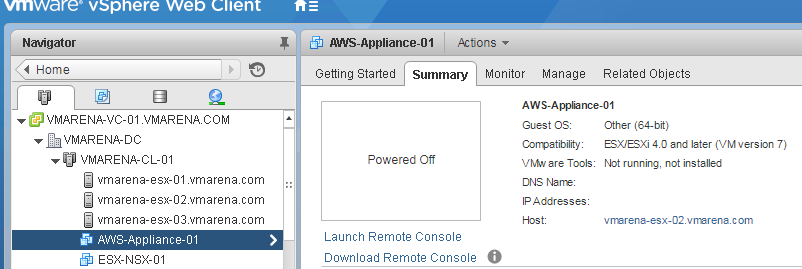
Once deployed the Appliance , You can power on and configure the IP address
Configure the AWS Gateway Appliance
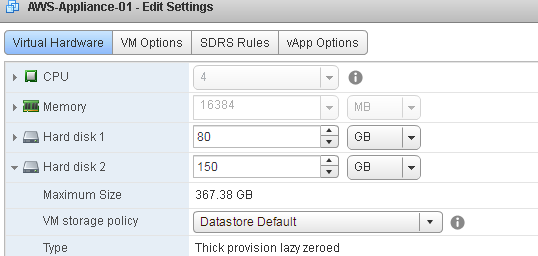
Before start the configuration of IP address you need to Configure the NTP sync and Add an additional drive for Cache with 150 GB
Right click the VM and select Edit Settings -> VM Options ->Time and Select Synchronize guest time with host

Add a new Hard drive of 150 GB from Virtual Hardware with new SCSI controller with type of VMware Paravirtual.
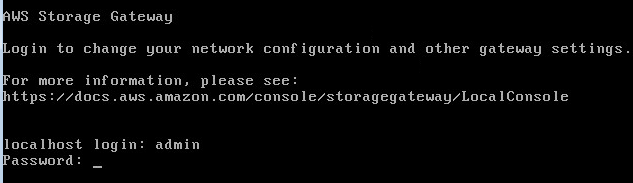
Now power on the AWS appliance Virtual Machine and Login to console using default username and password ( admin /password )
Configure the Network by selecting Option 2
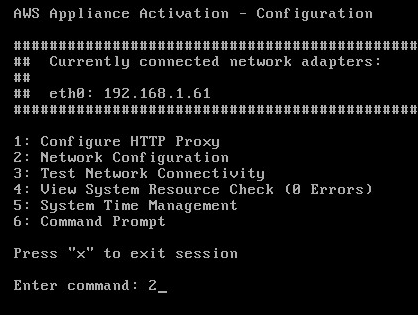
Select the Configure Static IP option using 3 and add the details and enter “Y” to save the configuration

Press Return to continue.

it will restart the networking and you can see configuration has been updated .

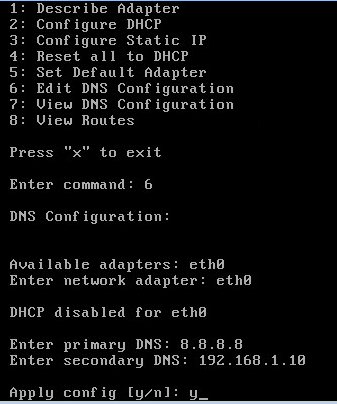
Next you have add the DNS to get access to the internet using option 6
Provide the detail and Enter “Y” to apply the details.
Enter x to complete the configuration.
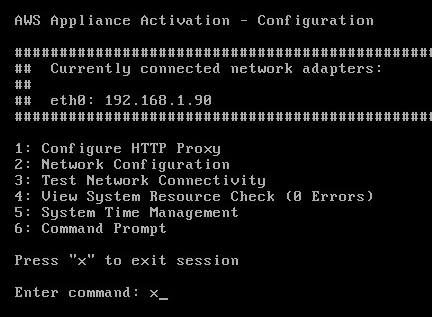
Configuration has updated in the system. Press Return to continue.
Now we can continue to configure the ASW Gateway from Amazon Service Console
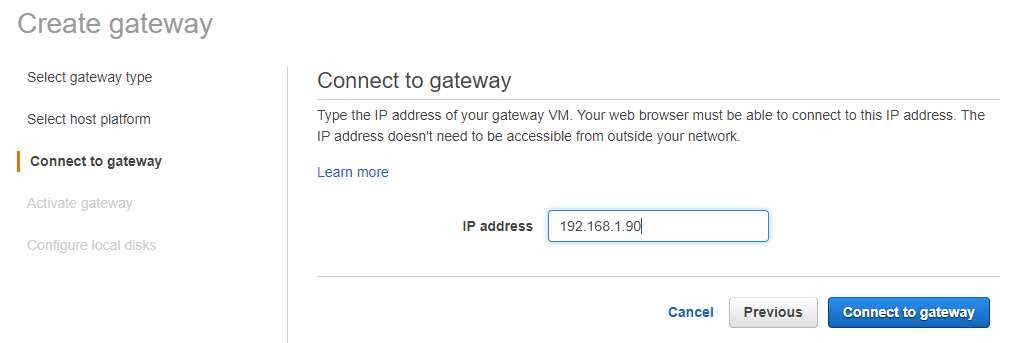
Enter the gateway IP ( Appliance IP) and Click on Connect to gateway option
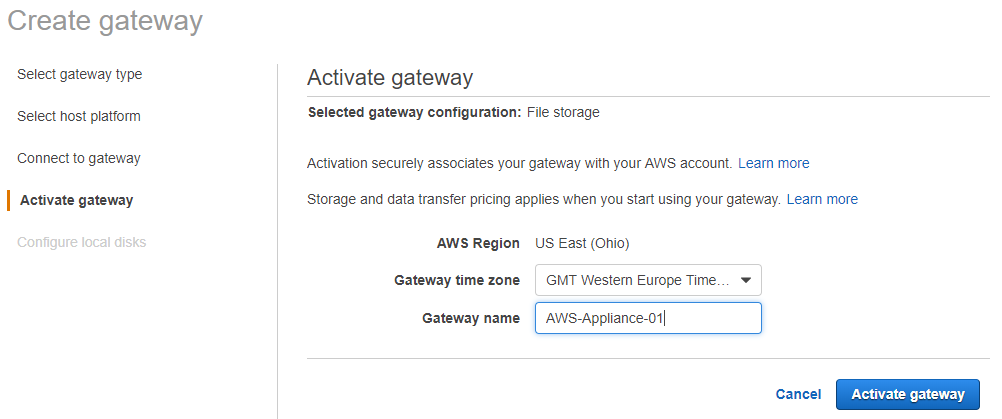
Next we have to activate the gateway , Provide a Gateway name and click on Activate gateway .
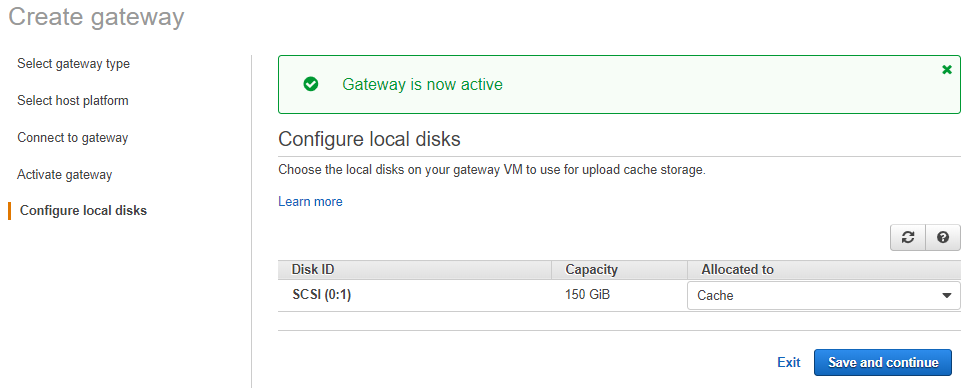
You can view message ” Gateway is now active ” and it will look for the disk available on the Gateway to configure if you have more than 1 disk , choose the disk required for the cache then click Save and Continue.
You will see message as Successfully created gateway and select the gateway and you can view the details
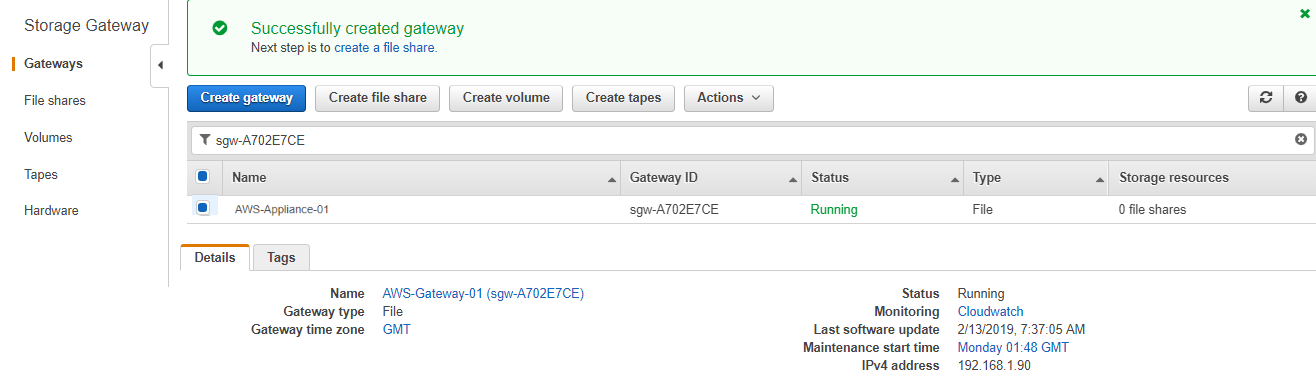
We have successfully configured AWS Gateway , Next we have to create a S3 Bucket required to create a file share.
Create an Amazon S3 Bucket
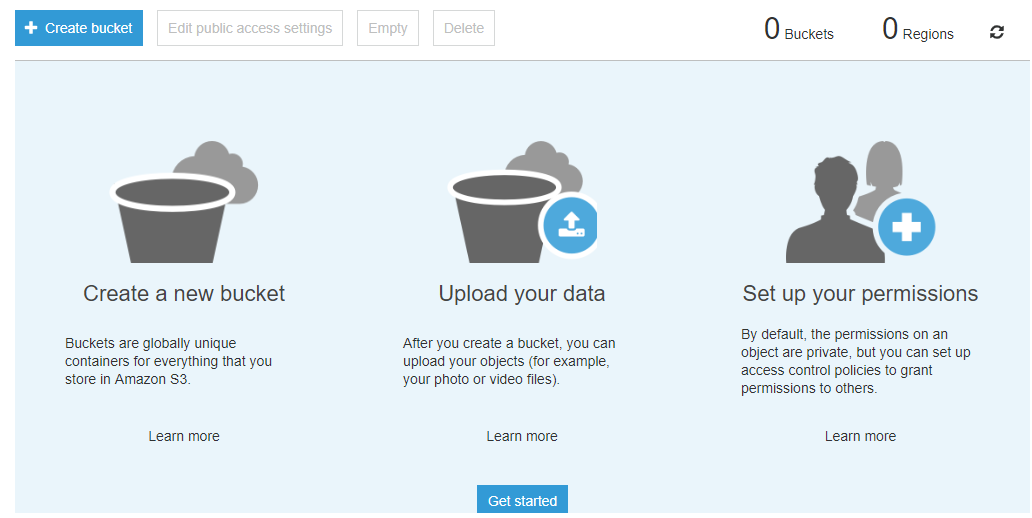
Navigate to AWS Management Console, select S3 under Storage option.
Click the + Create bucket button.
Provide a Bucket name and the Region then click Next.

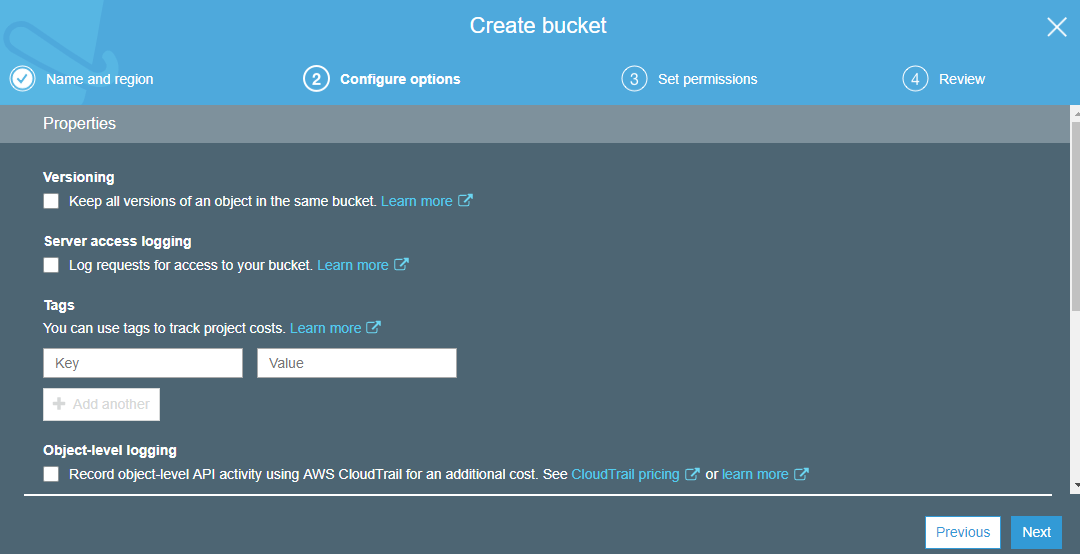
If required you may activate specific features else click Next to continue without selecting any
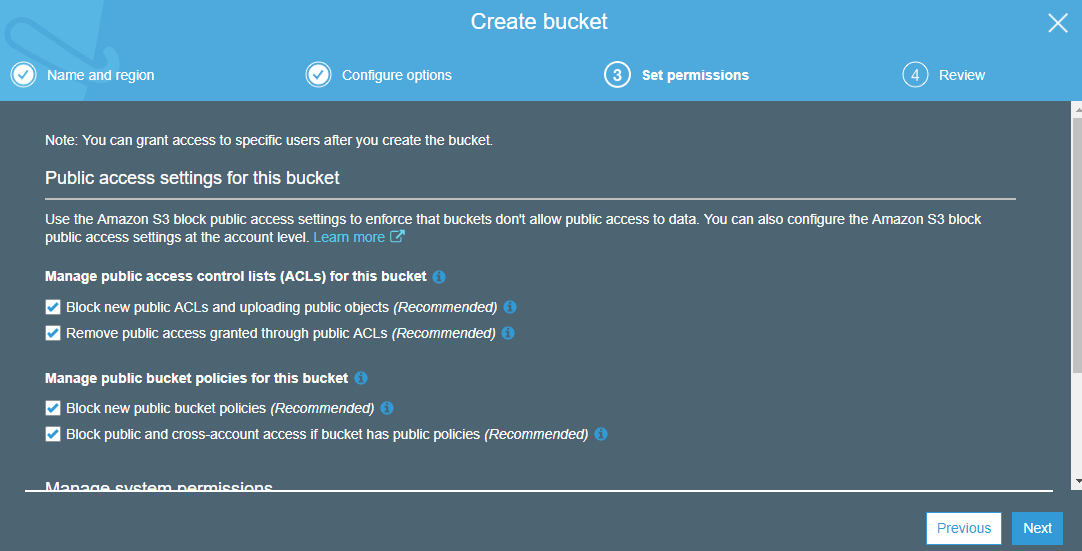
You may modify the Public ACL and Policies here , her we are not modifying anything and click next to continue
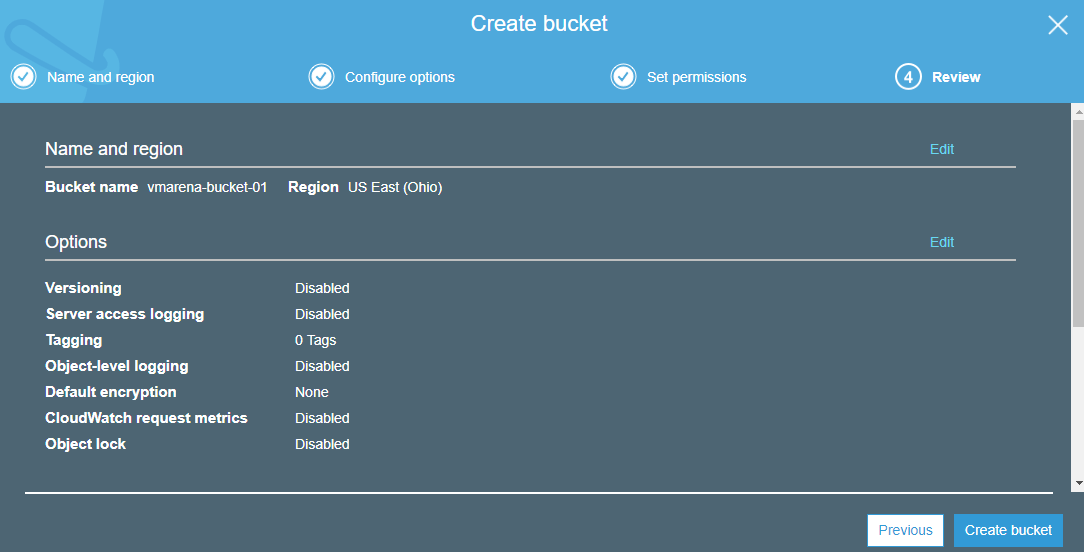
Review the details and Click on Create bucket
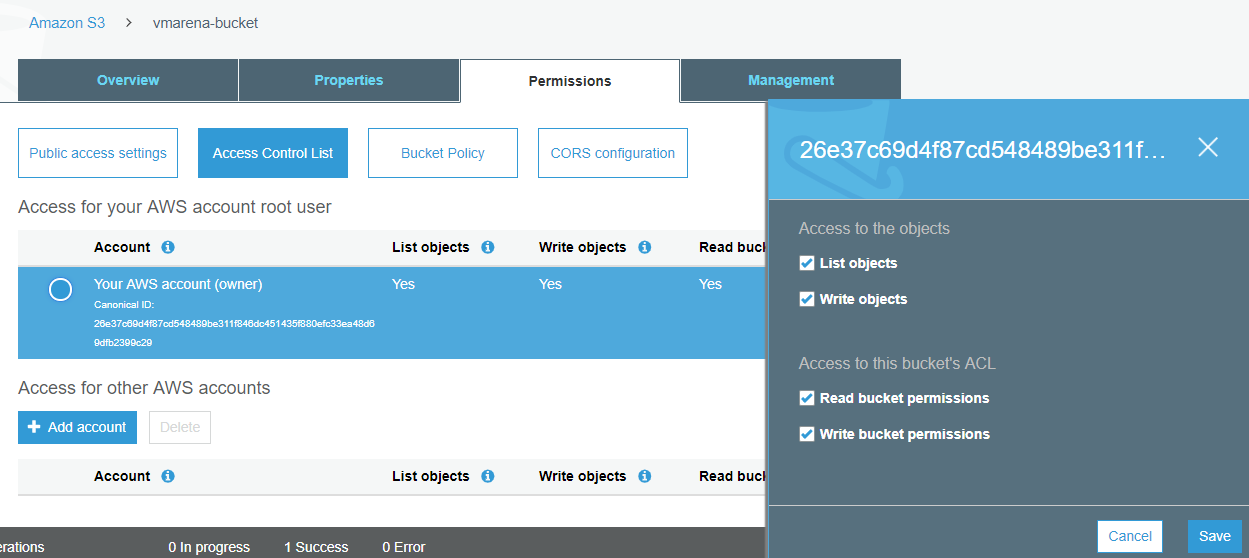
Amazon S3 Bucket has been created now you modify the setting on the bucket if you need .

Owner has access to the bucket you may add additional AWS account there and provide access .
Next will Create a file share
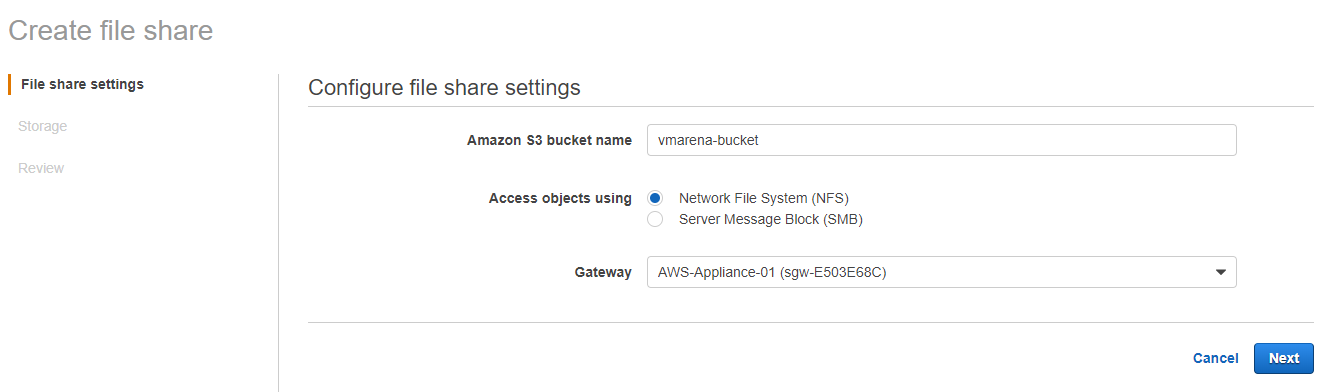
Once we created the S# bucket and it available to use navigate to the Storage Gateway configuration page and click Create file share.
Enter the Amazon S3 bucket name and leave default options. Click Next , Note that you have to enter same bucket name no changes .
Since we create the share first time leave it as default and click next , if you have an exiting IAM role you may choose that , also storage class based on subscription you can modify that .
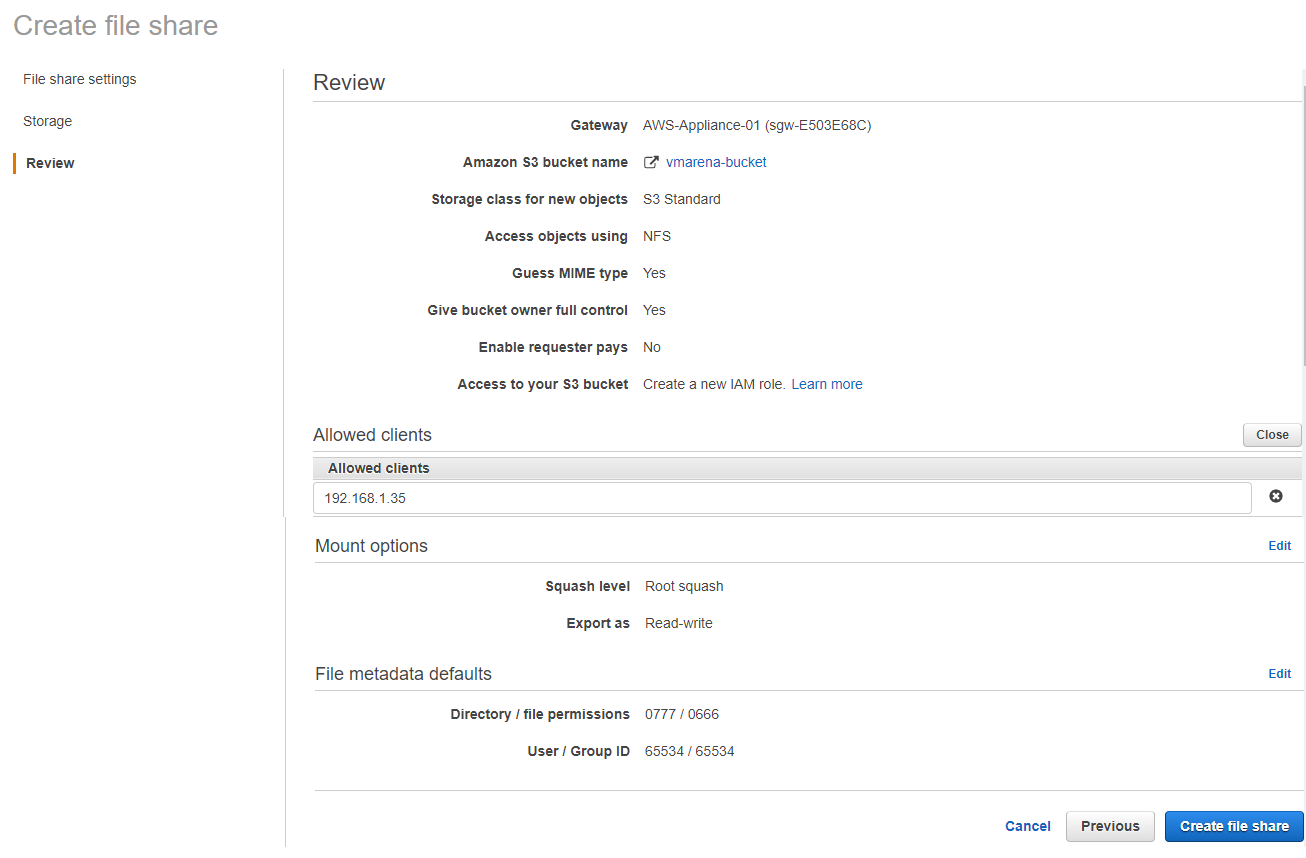
Review details , and you can modify the access to file share from this window
- Allowed clients: the default value to 0.0.0.0/0 to allow the access from any IP. It is advised to change this configuration for more security and we configure the backup solution IP address here , you add IP or complete network ( 192.168.1.35 or 192.168.1.0/24)
- Squash level: by default, this parameter is set to Root squash , you may modify that as per requirement
Click Create file share to save the configuration.
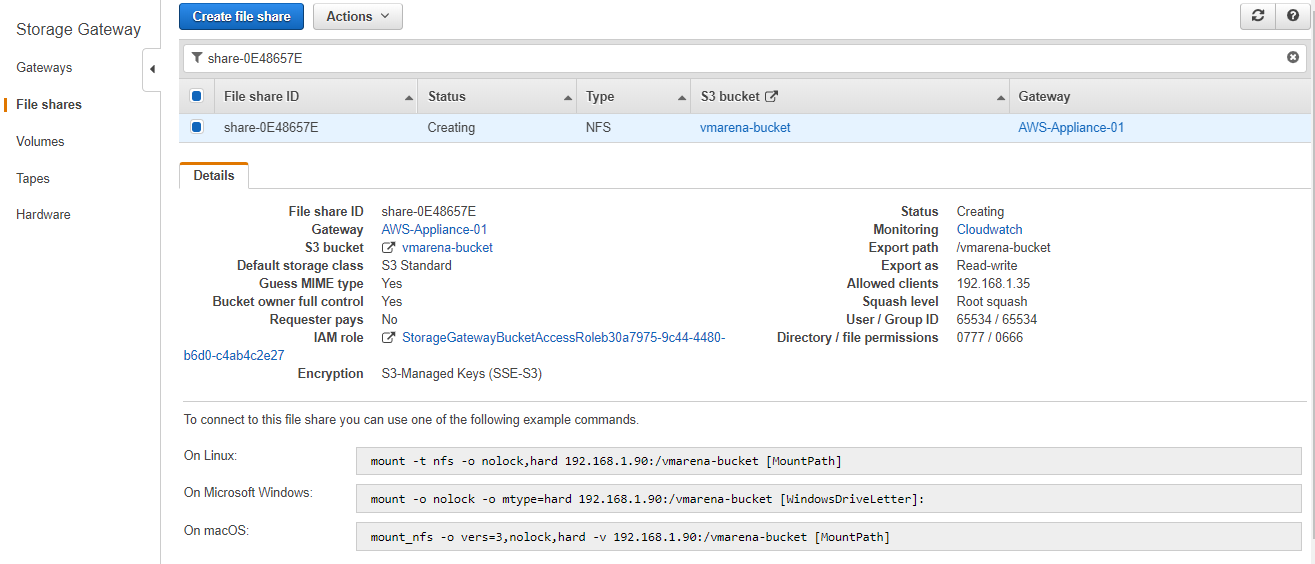
The file share has been created successfully .
Select the file share and you can review the details , and you will get the details how to mount the share on Linux , WIndows and Mac .
Reference – Amazon Storage Gateway Doc
Conclusion
We have successfully created Storage gateway in AWS environment and file share is available as offsite storage . You may configure the this as external backup repository and start backing up your data .